

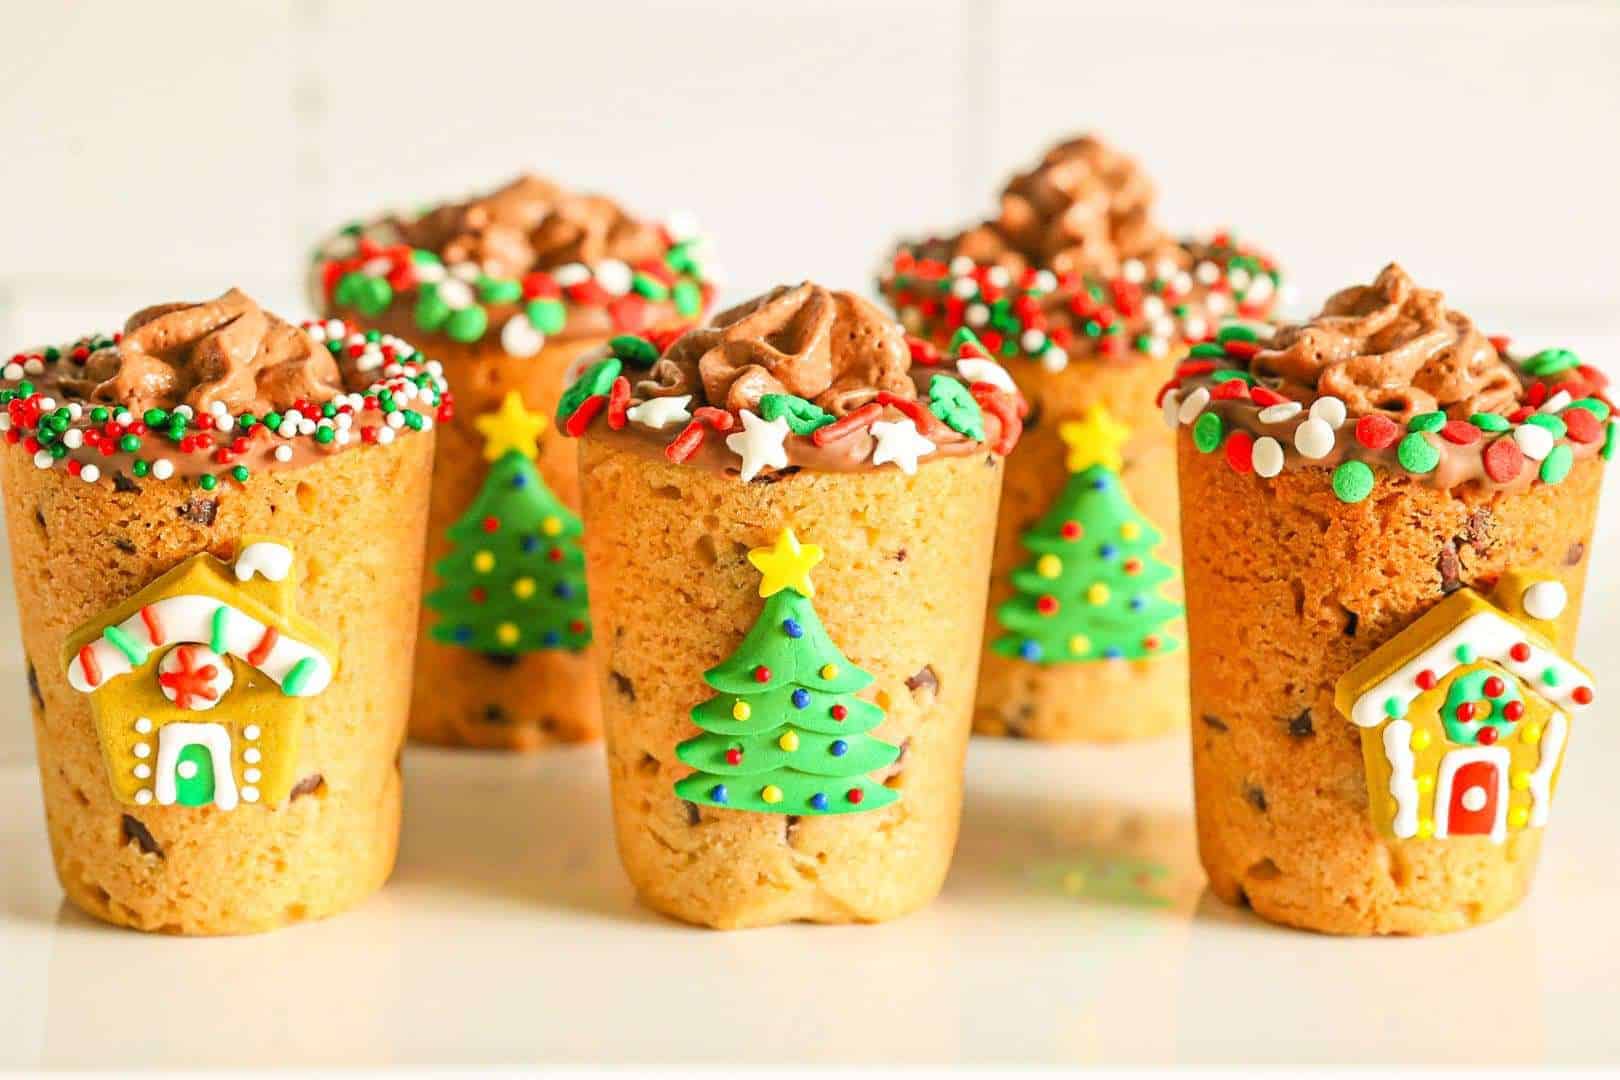
These show-stopping Christmas Chocolate Chip Cookie Shots are an absolute crowd pleaser at any holiday event. Fill them with milk, chocolate mousse, white chocolate mousse, pudding, Baileys Irish Cream, liquor, whipped cream, or even ice cream. They are completely customizable with your favorite decorations for any holiday of the year!
These Christmas Chocolate Chip Cookie Shot Glasses all started when a friend of mine asked if it would be possible to make an edible cookie shot glass for an event. After one look at the picture she showed me, I said these were a great idea but honestly way beyond my skill level. I explained even though they probably won't turn out, it would at least be fun to try.
The next day I purchased the supplies and researched every review of the molds I could find. I couldn't believe it, but on my first try, I managed to pull it off! These adorable chocolate chip cookie shots were so much fun to make, and I hope you love them as much as we did.
The filling for these edible cookie shots is entirely up to your imagination. You can fill the cups with milk, Nutella chocolate mousse, white chocolate mousse, pudding, Baileys Irish Cream, whipped cream, ice cream, or even your favorite liquor. The endless possibilities are definitely a conversation starter for your next holiday event.
Why This Recipe Works
- This chocolate chip cookie dough has almost twice as much flour and NO baking powder. As a result, the dough bakes up much harder, resulting in a crispy cookie that holds its shape.
- This chocolate chip cookie shot recipe is completely customizable for any seasonal holiday such as Easter, Thanksgiving, or even the 4th of July.
- Cookie shots can be made in advance. I kept them in my fridge for two days to see how they would hold up, and they still looked fantastic.
Cookie Shot Glass Ingredients
- All-Purpose Flour - This chocolate chip cookie dough must be sturdy and crunchy to hold up. This recipe has much more flour than a traditional chocolate chip cookie dough recipe like my Browned Butter Chocolate Chip Cookies.
- Light Brown and Granulated Sugar - I would not recommend substituting light brown sugar for dark brown sugar, as dark brown sugar will make the dough softer.
- Unsalted Butter - Unsalted butter allows us to control the amount of salt used in this recipe.
- Eggs - Large, room temperature eggs are always best when baking cookies as they will incorporate easier into the cookie dough than if they were cold.
- Mini Chocolate Chips - Mini Chocolate chips work best for this recipe as regular-sized chocolate chips are too large to form the walls and base of the cookie shot glasses.
- Pure Vanilla Extract - I recommend using a good quality vanilla extract that specifically states the words "pure." Those that do not include this word may not include natural vanilla.
- Salt & Baking Soda - Salt is added for flavor, and baking soda adds crispness to the dough, which is needed to hold its unique shape.
- Melting Chocolate Wafers - Ghirardelli melting chocolate wafers work best in this recipe. They create a smooth surface for the inside cookie shot lining and are thick enough to prevent leaks if filled with liquid such as milk or liquor.
- Various Holiday Sprinkles & Holiday Icing Decorations - Decorate the rims of the cookie shots with some fun holiday sprinkles. I used Christmas-themed icing decorations on the front of the cookie shot glasses. Icing decorations come in all different shapes, like candy canes, Christmas trees, or even mini gingerbread men.
How to Make Chocolate Chip Cookie Shots
Making the Chocolate Chip Cookie Dough
- In the bowl of a stand mixer fitted with the paddle attachment, combine the room temperature butter, brown sugar, and granulated sugar and mix on medium speed for about four minutes until light and fluffy.
- Once the butter and sugar are light and fluffy, add the vanilla extract and continue mixing until combined.
- Next, add the eggs, one at a time, and mix until combined.
- Next, mix flour, baking soda, and salt in another large bowl with a whisk.
- Add the dry ingredients to the wet ingredients in fourths on low speed, adding each portion once the last has just been combined, scraping down the sides with a spatula each time. At this point, the batter will become VERY thick.
- Once all flour is combined, fold in the chocolate chips with a spatula. Combining the chocolate chips may take some strength as the dough will be thick.
- Transfer the cookie dough to a bowl, cover with plastic wrap, and refrigerate for at least two hours or overnight.
Making The Chocolate Chip Cookie Shot Mold
You can find a few different molds to make these cookie shot glasses. I love using this Wilton cookie shot glass mold.
- Start with the bottoms of each of the molds first. Remove the cylinder inserts and set them aside. Scoop out about one teaspoon of dough and roll it into a ball with your hands.
- Next, while holding the cookie dough ball in one hand, use the palm of your other hand to press and flatten the ball into a disk about ¼th an inch thick. The dough disk should fit on the bottom of each mold when laid flat. Place each dough disk into the bottom of each mold. Continue until each mold compartment has a dough disk inserted into the base.
- Next, take about two teaspoons of the chocolate chip cookie dough at a time, and roll it into a ball again. Then flatten the dough into about ¼th an inch thick and press into the walls of the cookie shot mold. Working your way up from the bottom, continue until all the walls of the shot glass have been created. The wall of each cookie shot glass should be about ¼th an inch thick.
- Next, place the cylinder inserts in the dough-filled molds and press down evenly. Then, gently twist the insert upward and remove it. Inspect the inside of the cookie shots and patch any gaps or thin spots with small pieces of cookie dough as needed. If pieces need patching, you must press the insert in again. If no patching is necessary, place the insert exactly where it was without pressing again.
- Bake the chocolate chip cookie shots at 350°F with the inserts for about 21-23 minutes.
- Once done, working quickly, take a sharp knife and cut around the insert at the top of the mold, removing the excess dough that has puffed up over the top. Cutting away the extra dough creates a straight edge on the top of the glass. As the cookie dough cools, it will become more challenging, so working fast is essential.
- Allow the chocolate chip cookie shots cool while still in the mold for about five minutes. Then remove the metal inserts and transfer the cookie shot mold to a wire rack, allowing it to cool completely.
- Once the cookie shot molds are cool, take one finger and slide the inside walls of the cookie toward the top. They should slide right out. Once the cookie shots are entirely cool to the touch, they are ready to be lined with chocolate.
Decorating and Filling the Chocolate Chip Cookie Shots
The insides of the cookie shot glasses need to be lined with chocolate if you want to fill them with liquid. The chocolate linking ensures liquid does not dissolve the chocolate chip cookie glass before you have a chance to enjoy them both.
A small pastry brush works best to accomplish this, and Ghirardelli Chocolate Melting Wafers create a smooth thick lining perfect for holding any filling.
- Melt the chocolate melting wafers in the microwave or a double boiler (per package instructions). If using the microwave method, work with and melt about 3 oz of chocolate at a time because once it hardens, it becomes difficult to melt and stay the correct consistency again.
- Next, with a small pastry brush, coat the inside of the cups with chocolate making sure there are no gaps. Be liberal with the inside chocolate coating and work quickly as the chocolate hardens fast.
- Turn the cups upside down and dip the cup's rim in the chocolate. Let the excess chocolate drip off and immediately sprinkle the rim with sprinkles. You may need to reheat the chocolate in the microwave for 10-15 seconds to loosen it up. Tip: After the insides of the cookie shots are coated with chocolate, work with one shot glass at a time. First, dip the rim in chocolate, then cover with sprinkles. Then continue to the next cookie shot. If you wait to apply the sprinkles until all rims are coated in chocolate, the chocolate will have hardened, and the sprinkles will not stick to the chocolate.
- To add icing decorations, brush a small amount of chocolate on the backside of the icing decoration. Then, gently press it into the front of each cookie shot glass. Hold the icing decoration in place with your finger for at least 30 seconds.
- Finally, once the chocolate has cooled, the cookie shot glasses are ready to be filled and enjoyed! Fill them with milk, Baileys Irish cream, chocolate mousse, ice cream, or whipped cream.
Variations & Substitutions
- Customize the sprinkles and icing decorations for any seasonal holiday.
- Use white chocolate melting wafers mixed with different colors of food coloring to create colored chocolate rims.
- Fill the cookie shots with milk, chocolate mousse, white chocolate mousse, pudding, Baileys Irish Cream, whipped cream, or even ice cream.
Tips For This Recipe
- These chocolate chip cookie shots call for so much flour, and the dough becomes so thick that it would be difficult to mix without a stand mixer.
- Chill the cookie dough for at least two hours or overnight before filling the molds. Colder cookie dough is easier to work with and spreads less.
- After filling the shot glass mold, when you place the insert in the middle and press down, make sure to do so as even as possible. If you press down and the insert is leaning to one side even slightly, the walls of your glass will result in different thicknesses.
- After filling the molds and placing the inserts, wipe away any excess cookie dough that spills over the top before baking.
- After baking, work quickly to remove the excess cookie dough puffed up over the top of the shot glass molds.
- Greasing the molds is not necessary since the pan is non stick.
- Make sure to use mini chocolate chips. Regular-sized chocolate chips are too big for the walls of the cookie shots.
- Ghirardelli chocolate melting wafters harden very quickly. When coating the inside of the cups with chocolate, make sure to work quickly. Use a liberal amount of chocolate on the insides of the cups. You may have to heat the chocolate back up as you continue.
More Related Recipes
White Chocolate Peanut Butter Cookies
Browned Butter Chocolate Chip Cookies
Easy Mini Oreo Cheesecake Bites

Christmas Chocolate Chip Cookie Shot Glasses
Equipment
- Small pastry brush
Ingredients
- 4 cups All-Purpose Flour (480 grams)
- 1 cup Light Brown Sugar
- ¾ cup Granulated Sugar
- 1 cup Unsalted Butter (room temperature)
- 2 large Eggs (room temperature)
- ¾ cup Mini Chocolate Chips
- 2 teaspoon Pure Vanilla Extract
- 1 teaspoon Salt
- ¼ tsp Baking Soda
- 10 oz Melting Chocolate Wafers
- Various Holiday Sprinkles
- 12 Holiday Icing Decorations
Instructions
Making The Chocolate Chip Cookie Dough
- In the bowl of a stand mixer fitted with the paddle attachment, combine the room temperature butter, brown sugar, and granulated sugar and mix on medium speed for about four minutes until light and fluffy.
- Once the butter and sugar are light and fluffy, add the vanilla extract and continue mixing until combined.
- Next, add the eggs, one at a time, and mix until combined.
- Next, mix the flour, baking soda, and salt in another large bowl with a whisk.
- Add the dry ingredients to the wet ingredients in fourths on low speed, adding each portion once the last has just been combined, scraping down the sides with a spatula each time. At this point, the batter will become VERY thick.
- Once all flour is combined, fold in the chocolate chips with a spatula. Combining the chocolate chips may take some strength as the dough will be thick.
- Transfer the cookie dough to a bowl, cover with plastic wrap, and refrigerate for at least two hours or overnight.
MAKING THE COOKIE SHOT MOLD
- Preheat the oven to 350°F. Start with the bottoms of each of the molds first. Remove the cylinder inserts and set them aside. Scoop out about one teaspoon of dough and roll it into a ball with your hands.
- Next, while holding the cookie dough ball in one hand, use the palm of your other hand to press and flatten the ball into a disk about ¼th an inch thick. The dough disk should fit on the bottom of each mold when laid flat. Place each dough disk into the bottom of each mold and press down slightly. Continue until each mold compartment has a dough disk inserted into the base.
- Then, take about two teaspoons of the chocolate chip cookie dough at a time, and roll it into a ball again. Then flatten the dough into about ¼th an inch thick and press into the walls of the cookie shot mold, working your way up from the bottom. Continue until all the walls of the shot glass have been created and are about ¼th an inch thick.
- Next, place the cylinder inserts in the dough-filled molds and press down evenly. Then, gently twist the insert upward and remove it. Inspect the inside of the cookie shots and patch any gaps or thin spots with small pieces of cookie dough as needed. If pieces need patching, you must press the insert in again. If no patching is necessary, place the insert exactly where it was without pressing again.
- Bake the chocolate chip cookie shots at 350 degrees with the inserts for about 21-23 minutes.
- Once done, working quickly, take a sharp knife and cut around the insert at the top of the mold, removing the excess dough that has puffed up over the top. Cutting away the extra dough creates a straight edge on the top of the glass. As the cookie dough cools, it will become more challenging, so working fast is essential.
- Allow the chocolate chip cookie shots cool while still in the mold for about five minutes. Then remove the metal inserts and transfer the cookie shot mold to a wire rack, allowing it to cool completely.
- Once the cookie shot molds are cool, take one finger and slide the inside walls of the cookie toward the top to remove them. They should slide right out. Once the cookie shots are entirely cool to the touch, they are ready to be lined with chocolate.
DECORATING AND FILLING THE CHOCOLATE CHIP COOKIE SHOTS
- Melt the chocolate melting wafers in the microwave or a double boiler (per package instructions). If using the microwave method, work with and melt about 3 oz of chocolate at a time because once it hardens, it becomes difficult to melt and stay the correct consistency again.
- Next, with a small pastry brush, coat the inside of the cups with chocolate making sure there are no gaps. Be liberal with the inside chocolate coating and work quickly as the chocolate hardens fast.
- Turn the cups upside down and dip the cup's rim in the chocolate. Let the excess chocolate drip off and immediately sprinkle the rim with sprinkles. You may need to reheat the chocolate in the microwave for 10-15 seconds to loosen it up. Tip: After the insides of the cookie shots are coated with chocolate, work with one shot glass at a time. First, dip the rim in chocolate, then cover with sprinkles. Then continue to the next cookie shot. If you wait to apply the sprinkles until all rims are coated in chocolate, the chocolate will have hardened, and the sprinkles will not stick to the chocolate.
- To add icing decorations, brush a small amount of chocolate on the backside of the icing decorations and gently press it into the front of each cookie shot glass. Hold the icing decoration in place with your finger for at least 30 seconds
- Finally, once the chocolate has cooled, the cookie shot glasses are ready to be filled and enjoyed! Fill them with milk, Baileys Irish cream, chocolate mousse, ice cream, or whipped cream.


Amanda Camera says
I was lucky enough to get some of these cookies and they were a hit! The cookie was delicious! I made an espresso martini shot to fill and the chocolate inside kept the liquid perfectly. Definitely make these for a holiday crowd pleaser!!